.jpg)
Friday, 10 December 2010
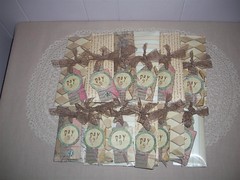
12 Day Of Christmas Swap
I am in Group one of 3 of the Byhand Artists 12 Days Of Christmas gift swap and here are my wrapped day 9 gifts ready to be put in envelopes and mailed.
Nov. ATC Swap At The Grind
 Nov. 21 was the regular ATC Vancouver Swap and was also the 10th anniversary. We decided this year's special swap would be houses and they could be from matchbox size to ATC size. These are the 8 I managed to complete in time for the swap.
 This is my Freedom House, made with printers cleanup paper and a bit of beads.
 Corrugated Cottage is made from corrugated cardboard and the paper pealed from one surface is used for the roof. The walls are white washed with acrylic paint and the roof done with red and some white highlights.
 One of my "Cozy House or House Cozy?" houses. I knit 3 houses and used embossed printers cleanup paper for the roof.
 These little books with recycled pizza box covers were the little gift inside the house boxes.
 The collection of houses I received in trade for my houses.
Friday, 3 December 2010
Christmas Countdown Images
The Ten Two Studio Christmas Countdown for 2010 has started, so go visit and start collecting the free images.
Thursday, 11 November 2010
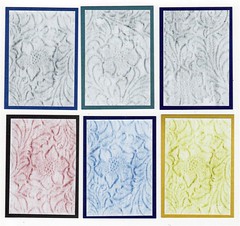
Rubbings ATCs For Nov. Swap
Finally a bit of creativity came to me this morning thanks to a visit to Ruby Dog's Art House, a gift of a piece of textured vinyl and a demo of doing a rubbing by Leanne, I tried it out and came up with these ATCs. The backgrounds are printer's clean up paper.
Saturday, 16 October 2010
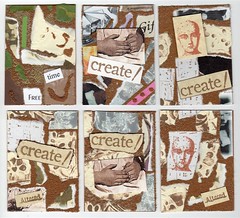
ATC Oct 2010 Word Scraps
Tomorrow is the monthly swap at The Grind and I managed to get some ATCs made so I can go trade. The themes are octagons, oracles and octopi, but since I didn't have much time for creating art and I have lots of scraps I decided to go off topic. I used some cereal box cardboard run through the Zyron and I dug through my bag of scrap papers, glued with the Zyron adhesive. I left room between the pieces and added gold embossing powder to some of the ATCs and micro beads to all of them. I have added assorted rubber stamp words and images to each of the ATCs. There is another set of six ATCs over on my Flickr photos if you would like to check them out.
Oct 9, 2010 Greeting Card
Because of continuing medical issues with a family member, I didn't make it to the card project today, but I did get there last Sat. and I have finally taken some time to post the card.
The greeting card at Cherish The Thought is rubber stamped and coloured with Tombow markers and the image is layered over a pink cardstock. The card base is yellow with a die cut "apron".

The greeting card at Cherish The Thought is rubber stamped and coloured with Tombow markers and the image is layered over a pink cardstock. The card base is yellow with a die cut "apron".
Sunday, 26 September 2010
Greeting Card Sept 25
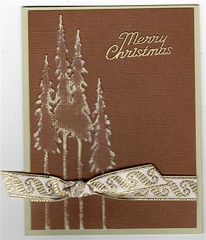
I took a bit of a creative break yesterday, since I found a transit route that allowed me to stop in Port Moody, then carry on to the hospital. This is the Neat Nique for Sat Sept 25 at Cherish The Thought. We used a tree embossing folder on Core Color cardstock and sanded the high spots. There is glitter added to the light areas of the tree, but of course not very easy to see on screen. The core color piece is added to a light green card base and a Merry Christmas Peeloffs sticker is added as well as a lovely ribbon. It was nice to be creative for awhile.
Tuesday, 14 September 2010
ATC A Bit of Wool
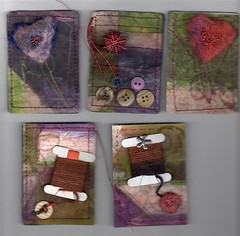
This months ATC Vancouver swap at The Grind has themes of weather, windows and wool. I decided to do some wool theme. The top three are titled "A Bit of Wool Needle Felt". The background is a scan of some paper cloth I tried about a week ago.
The bottom two are the paper cloth with sock yarn wound on bobbins and one has a needle felted button while the other has a button.
I will also include at least one of these in the exhibit entry I'm sending to Vernon. Now to just choose which 6 I'll send.
The bottom two are the paper cloth with sock yarn wound on bobbins and one has a needle felted button while the other has a button.
I will also include at least one of these in the exhibit entry I'm sending to Vernon. Now to just choose which 6 I'll send.
Monday, 13 September 2010
Asian Theme ATCs
I have been working on some ATCs to submit to the Vernon Public Art Gallery ATC Exhibit and some of these along with some others will be going in the mail soon. I was playing with recycling and really liked the image on this Green Tea with ginger and honey tin. All of these ATCs are from one aluminum beverage tin. Four have a Dover Asian image and 3 of those have sugar beads added.On the top card the piece of aluminum was embossed with a Tim Holtz Sizzix folder and mounted on part of a Cuttlebug Cut and Emboss folder. The next 2 are full ATC size tin and the bottom two have a small strip down the left side.

Monday, 6 September 2010
Sept 4 Greeting Card
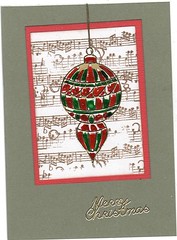
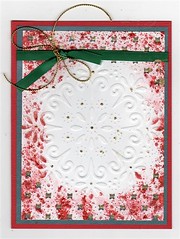
This is the Sat Sept 4th Neat Nique card at Cherish The Thought. The white background is stamped several time with Crafty Secrets music border stamp, layered on a slightly larger red cardstock and mounted on a green base. The peel-offs Merry Christmas is added just below. The acyclic card front is scored at .25 in. and attached to the back of the card with Soukwang tape. The peel-offs ornament is placed on the front of the acrylic and coloured with glaze pens.
Wednesday, 1 September 2010
Creative Escape Journal Page Aug 31
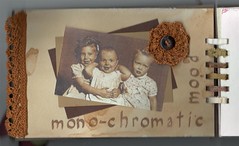
This page in my Creative Escape Journal evolved this morning with inspiration from a link on the MmarioKknits Yahoo group. One of the members posted about this Erika Knight baby hat pattern which has a lovely edging on the bottom that the member is using for other projects. I saw the flower and edging and thought it just had to be done in my journal. This is done on one of the coffee dyed watercolour pages. I converted an old black and white photo to sepia and layered it over a kraft and dark brown cardstock. The lace flower and edging are knitted with 2.25 mm needles and a light brown cotton thread. I used some of the same thread to sew the edging to the edge of the page and to sew a button to the centre of the flower. The words are rubber stamped with a clear alphabet set and Versafine Vintage Sepia ink. I am very pleased with how it turned out.
Greetong Card Aug 28
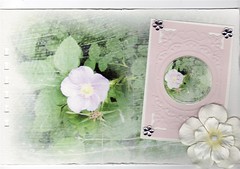
This is the neat nique project from Aug 28 at Cherish The Thought. Yes I got there and am thrilled that I did. This is a wonderful technique that I am sure I will be doing again. The black and white photo printed on shiny cardstock is hand coloured on one of the roses with pencil crayon and blended with a paper stump. This is layered over 2 pieces of cardstock, then onto a pale grey embossed piece and finally on a lovely light green card blank.

Wednesday, 25 August 2010
21 Aug Greeting Card
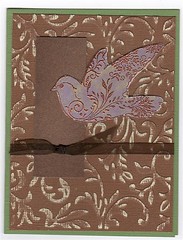
This is the card project from the Sat. Aug 21 Neat Nique at Cherish The Thought.The Core d nations cardstock is embossed and then sanded to remove the colour off the high points. The bird from Crafty Secrets is stamped and embossed on shiny cardstock, colourde with a stencil brush and cut out. It is mounted with a foam dot.
My Finished Envelope Book
I think I've said this before, Sunday was the big day, our regular ATC Vancouver monthly swap at The Grind and the delivery of my Envelope Book. I love Penelope's creative wrapping.
 It's always such a pleasure to receive the collaborative projects back from Penelope.
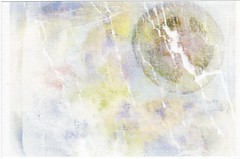
 This is the very interesting recycled wrapping Penelope used to present my envelope book to me last Sun. Isn't it fabulous, I have saved it to use in future projects.
 My front cover, we were given the pre-punched covers along with the envelopes and each of us decorated the covers for our own book. You saw these as lonely covers waiting for pages in this precious post.
 This is a view of all the pages, doesn't this just make you want to see more?
 This is the back cover of my book made with sepia varnished scrapbook paper, distressed chipboard and a digital image of a vintage envelope with digital text added.
So I have another wonderful treasure to add to my collection, I know I am very lucky to be a part of this ATC group.
 It's always such a pleasure to receive the collaborative projects back from Penelope.
 This is the very interesting recycled wrapping Penelope used to present my envelope book to me last Sun. Isn't it fabulous, I have saved it to use in future projects.
 My front cover, we were given the pre-punched covers along with the envelopes and each of us decorated the covers for our own book. You saw these as lonely covers waiting for pages in this precious post.
 This is a view of all the pages, doesn't this just make you want to see more?
 This is the back cover of my book made with sepia varnished scrapbook paper, distressed chipboard and a digital image of a vintage envelope with digital text added.
So I have another wonderful treasure to add to my collection, I know I am very lucky to be a part of this ATC group.
My Envelope Book Pages
Now that everyone has their envelope book I can show you my envelope pages and the contents.
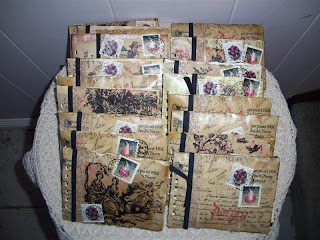 Here is all 17 of the envelopes that I decorated for the envelope book created by 17 members of the ATC Vancouver swap group. I used paper from brown gift bags with a vintage black image, vintage letter ribbon, lace and some of my faux postage stamps.
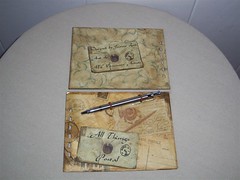
 The front of a couple of envelope pages.
 The back of a couple of my envelopes. These used up some of my stash of 6X6 scrapbook papers painted with sepia acrylic varnish.
 This is one of my envelopes and the contents. Each envelope contained an ATC, all diferent and decorated on the back to look like a miniature postcard, the ATC background viewer, 2 pieces of lace and 2 hug tickets.
 This is an ATC background viewer that I included as a tool in my envelopes. It is cut from chipboard or cereal box cardboard and is the frame left when cutting an ATC with the Sizzix die. Ive had a and cut version that I've used for years to see what a background or stamped image would look like.
 Here is all 17 of the envelopes that I decorated for the envelope book created by 17 members of the ATC Vancouver swap group. I used paper from brown gift bags with a vintage black image, vintage letter ribbon, lace and some of my faux postage stamps.
 The front of a couple of envelope pages.
 The back of a couple of my envelopes. These used up some of my stash of 6X6 scrapbook papers painted with sepia acrylic varnish.
 This is one of my envelopes and the contents. Each envelope contained an ATC, all diferent and decorated on the back to look like a miniature postcard, the ATC background viewer, 2 pieces of lace and 2 hug tickets.
 This is an ATC background viewer that I included as a tool in my envelopes. It is cut from chipboard or cereal box cardboard and is the frame left when cutting an ATC with the Sizzix die. Ive had a and cut version that I've used for years to see what a background or stamped image would look like.
Saturday, 21 August 2010
The Thank You Gift
Last Sunday at the ATC Vancouver swap I delivered the mini journal in the previous post along with a small knit felted bag as a thank you gift to Penelope for hosting our collaborative Envelope Book. Penelope has finally started a blog and you can check out her posting here.
 This is how I wrapped the gift. I used Ikea drawing paper randomly stamped with several different stamps, sandwiched between wax paper and stitched all around. This was then stitched into a pouch to hold the gift.
 This is the front of the gift pouch with lace seam binding used as a ribbon to tie the package closed.
Sunday, 15 August 2010
4 X 4 Mini Journal
I've just completed another of my mini journals using My Minds Eye Life's Journey scrapbook paper and some of my own journal pages. The pages are punched with the Zutter Bind-it-all and bound with ribbons and coffee dyed fabric. This is a thank you gift for a friend.
Greeting Card Aug 14
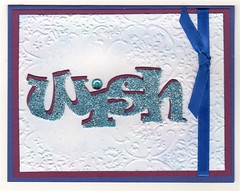
This is the neat nique project for this Sat at Cherish The Thought. Embossed with Cuttlebug embossing folder and a template to keep the circle area flat. Wish Sizzix die cut out of sticky paper and cardstock. The sticky paper is glittered then mounted slightly of centred on the cardstock piece to create a shadow effect. This is mounted on the embossed piece, which is mounted on another piece of cardstock and then onto the card blank.
Thursday, 12 August 2010
Greeting Card Aug 12 Byhand Challenge
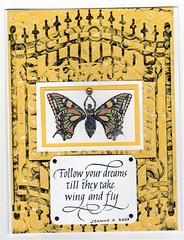
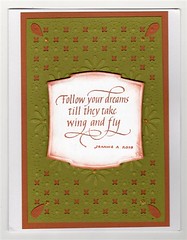
Yellow is one of the themes for the Byhand Challenge this week and I used a yellow scrapbook paper embossed with the butterflies background from the Cuttlebug Heritage embossing folder set. I sanded the high points to reveal the white core and then flattened it back out by running through the Cuttlebug a second time without the folder. Next I embossed with the gate folder, also from the Heritage set, and rubbed a Tuxedo Black Memento Dewdrop ink pad over the high points. The butterfly wings from a Crafty Secrets set are stamped and embossed with black, then coloured with gel pens. This is layered over a yellow and then white cardstock, attached to the gate background and a yellow gem sticker added to the goddess which is a Quietfire Design stamp. "Follow your dreams" quote is also from Quietfire Design and is stamped with Tuxedo Black Memento ink on white cardstock and attached to the gate with brads. This is then attached to a 5 X 6.5 white card blank
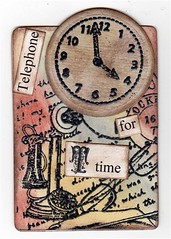
ATC Telephone For T Time
This is another example of ATCs for the August swap at The Grind in the Telephone and Time theme. I used a collage stamp which had a telephone and script and one from a time set for the clock.. The words are computer generated and the "T" is from a Crafty Secrets stamp set. The stamped images were embossed with Pearl Lustre Hematite embossing powder and the colour was added with Distress Inks.
Monday, 9 August 2010
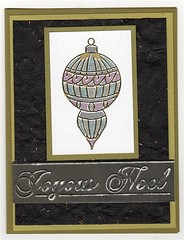
August 7 Greeting Card
The neat nique for Aug 7 at Cherish The Thought is a head start on Christmas cards with a peel-offs ornament on white cardstock, coloured with gel pens then mounted on green cardstock. This is mounted on black handmade paper, then onto a paler green cardstock and finally onto the green card blank. The sentiment is embossed with a Crafts Too folder on the dark side of double-sided scrapbook paper and sanded. Just don't look too closely at my colouring mistake which has nothing to do with Jessie's teaching, but is all my own.
Monday, 2 August 2010
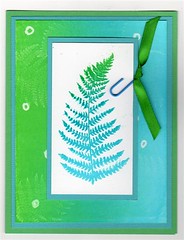
Greeting Card For July 31
Here is the card I made at Cherish The Thought for the Sat Neat Nique. For this we used a fern stamp and stamped it with Versamark on shiny cardstock, the drew random circles with a clear glaze pen. Next step was to brayer ink from a Big and Juicy Waterfall ink pad onto the cardstock, then rubbed with a tissue to reveal the fern and circles. Now we used a different fern stamp and stamped it on another shiny cardstock. This was layered over coloured cardstock, then over the masked and brayered piece, over another cardstock and finally on a green card black
I think it's very pretty and this is the first time I did masking and brayering ink like this. Big fun and I need a Big and Juicy ink pad.
I think it's very pretty and this is the first time I did masking and brayering ink like this. Big fun and I need a Big and Juicy ink pad.
Thursday, 29 July 2010
Is This Collage?
 I haven't done very much collage, I just have trouble figuring out what should go together. So here is my attempt which has enough green on it for the Created Byhand Challenge. This is an 8 X 10 artist canvas board that I glopped gesso on and made some texture marks with a plastic spoon. When that was dry I scribbled Reeves water soluble wax pastels on and blended with a wet brush. The next step was colouring on the still wet canvas with Portfolio water soluble oil pastels, rubbed around with my finger then blended with a dry brush. I let that dry, then rubber stamped a couple of large background stamps, one music and the other script.
 While this was drying I tried a Cuttlebug paint technique I read about somewhere on the internet. I put blobs and drizzles of paint on a piece of watercolour paper, placed another piece of watercolour paper over this and ran it through the Cuttlebug. I got 2 quite nice papers, but next time I think I'll just use a roller instead of the Cuttlebug, I don't like the risk of getting paint in my machine. When the paper was dry, I used my new Cuttlebug embossing folder from the Heritage set that I just got from Cherish The Thought yesterday. I sponged Walnut Stain Distress ink on the embossed areas to bring out the texture. My quote from Quietfire Design is stamped with Memento Rich Cocoa ink on a digital background I had leftover from the Tea Time ATCs. This was cut with Spellbinders Nestabilities Scalloped Oval and layered over a brown cardstock cut with the largest die from the Scalloped Oval set. The chipboard rectangles are cut with the Sizzix ATC die, dipped in coffee and the edges rolled until I got a nice distress look. They are stamped with some Michael's 79 cent stamps with Rich Cocoa ink and edged with Walnut Stain Distress ink. The white flower thingy is the back part of a button from Ruby Dog's Art House with a circle punched from scraps from the embossed painted paper and a brown half pearl in the centre.
Wednesday, 28 July 2010
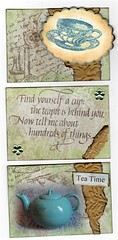
Tea Time Triptych 1
The themes for the ATC Vancouver swap at The Grind are telephone, time or tea pots. I focused mostly on tea pot with a digital photo of one of my tea pots and a Quietfire Design quote stamp.
Saturday, 24 July 2010
July 24 Greeting Card
Today's Neat Nique card at Cherish The Thought uses White Wash Core-Dinations cardstock and a new Cuttlebug embossing folder. This is lightly sanded to let the base colour show through. The stamp is from Local King rubber and is stamped with StazOn ink on cardstock cut with the Nestabilities scallop oval die cut. Jessie provided this beautiful striped ribbon which provides the perfect finishing touch.

Tuesday, 20 July 2010
Greeting Card Teapot
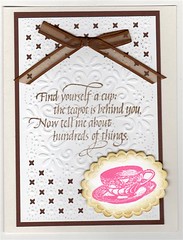
My all time favourite die cut project so far is a journal page I posted on July 1 and it would fit the Byhand Challenge for this week of Looking In, Looking Out or die cuts but I thought I should actually create a new project for the challenge. This card for the Created Byhand challenge uses the Cuttlebug Blooming Bouquet Embossing Plus folder for the main background and I rubber stamped the Quietfire quote with Versafine Vintage Sepia on white cardstock before running it though the Cuttlebug Embossing Plus folder. This is layered over brown cardstock then mounted on an ivory 5 X 6.5 in. card black. The teacup is stamped with Memento Rose Bud on a separate piece of white cardstock and cut with the Nestabillities classic scalloped oval and the edge rubbed with Vintage Photo Distress Ink. This is mounted with foam dots and a brown sheer ribbon bow is glued near the top.
Monday, 19 July 2010
ATC Vancouver July Swap at The Grind
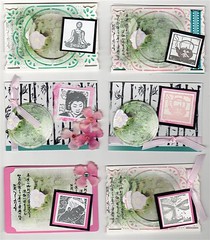
Now to the main reason for going to The Grind on Sunday, the regular monthly ATC swap. The themes for July were animals, architecture and Asian. I did all of mine on the Asian theme. I used stamps from 2 different Asian theme sets, the Chic Circle Embossing Plus Cuttlebug folder, my own flower photo and some silk flowers. Some of the photos were debossed and coloured with gel pens. These are a representation of some of my cards for this month.
Covers For Envelope Book
These are my covers for the envelope book collaborative project with artists from the ATC Vancouver Swap group. All my envelopes were delivered to our swap hostess Penelope on Sun at the regular ATC swap session. I'm not showing the envelopes I altered or the contents as I and some of the other participants would rather savour everything when we receive our finished books at the Aug. regular swap meeting. I feel it's fair game to show the covers though since everyone decorated their own and will get their own back anyways. I got through all the envelopes and contents which was not hard to plan, but did take some time. It seems to always take more time that I think it will. I really struggled for an idea to decorate the covers, then an idea came to me and it was done relatively quickly. I can't wait to see the finished book.
July 17 Greeting Card
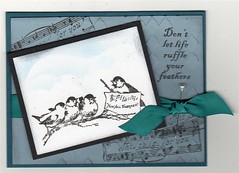
The neat nique for this Sat at Cherish The Thought used one of the Crafty Secrets clear bird theme stamp sets, Versafine ink, a Cuttlebug embossing folder and a Dreamweaver stencil. We used the stencil and Memento stamp pad to create the clouds, first time doing that for me and I like the result.
Wednesday, 14 July 2010
July Greeting Card 2
I made this card using a 5 X 6.5 inch white card blank and Spice Market cardstock. The green layer is embossed and cut with the Cuttlebug Blooming Bouquet Embossing Plus folder and layered over the orange cardstock. The little orange petals are drop out pieces from a Cuttlebug flower die cut. I added some Spiced Marmalade Distress Stickles on some of the dots. The Quietfire Design quote is stamped on white cardstock with Memento Potter's Clay ink and cut with the Spellbinders Label 2.
This is the same Embossing Plus folder I used on this card at the last Sat. neat nique project at Cherish The Thought, but this one uses the whole folder instead of just part of it.
This is the same Embossing Plus folder I used on this card at the last Sat. neat nique project at Cherish The Thought, but this one uses the whole folder instead of just part of it.
Sunday, 11 July 2010
July 10 Greeting Card
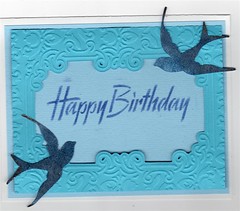
Here is yesterday greating card from Cherish The Thought. We used another of the new Cuttlebug Embossing Plus folders, but I didn't buy this one so I'm not sure of the name. This one is quite large and we used only part of it to fit a standard size care. Happy Birthday on the lighter blue cardstock is stenciled with stamp pad ink and a brass sencil. The birds are a Sissix die cut with adhesive paper and glittered. This is mounted on a white card blank and the embossed layer is mounted with glue dots.
Tuesday, 6 July 2010
Pink Flower Journal Page
Pink Flower ATC
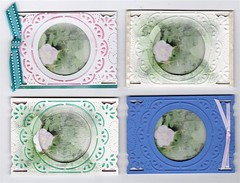
These are more samples of using the Cuttlebug Chic Circle Frame Embossing Plus folder and turning them into ATCs. Two of these samples use the debossed side and gel pens.
Cuttlebug Embossing Plus Chic Circle Sample
Some samples I worked on after getting the Cuttlebug Chic Circle Frame and making the journal page shown in the post here. The one on the left is Kraft cardstock using the debossed side and a white gel pen to highlight the debossed lines. The one on the right is using the folder on vellum layered on white metallic cardstock and the pink flower cutout inserted in the frame.

Monday, 5 July 2010
Journal Page Tomato 2
Judy, this is for you. I put this new set of journal pages together yesterday. I really like the structure of a cut tomato so this is a photo of a half tomato digitally layered over a scan of painted watercolour paper and a couple of special effects. This is printed on watercolour paper and is ready to be added to a future journal.There is a slight variation on my Flickr, but I like this one the best.
Sunday, 4 July 2010
July 3 Card Project
So the previous journal page used one of the new Cuttlebug Embossing Plus folders that just arrived at Jessie's store and I was lucky to be there before she introduced them at the Sat. Neat Nique and therefore had the journal page to show to rave reviews on Sat. This card made yesterday at Cherish The Thought uses the Cuttlebug Blooming Bouquet Embossing Plus folder on shiny card stock. The edge is coloured with Memories re-inkers on an application tool and blending solution. This is layered on green cardstock and then onto a red card base, with green ribbon and gold cord for trim. The little dots on the design are coloured with gold leafing pen.
Thursday, 1 July 2010
Journal Page
 This is one of the pages for a journal I am still working on and I am including some old family photos taken with an old box camera I had. Most of these are photos that no one else has, so I am making journals for gifts. I used a new cut and emboss folder that I just got yesterday from Cherish The Thought and made doors to show parts of the photo. I am very happy with the result.
This shows the photo with the doors open. The decoration above the door is part of Tim Holtz style label embossed with Tim Holtz Damask Texture Fades embossing folder. and sponged with Walnut Stain Distress Ink.
Subscribe to:
Posts (Atom)


.JPG)

 Download a FREE copy of the Artella eBook, Artella Mae's NEW Altered Ancestors!, a 58-page eBook overflowing with ideas and techniques for using vintage photos in your artwork.
  Download a FREE copy of the Artella eBook, Artist Profiles Assembled, a 100-page eBook featuring an inside look at the lives and art of 29 fascinating artists.
  Download a FREE copy of the Artella eBook, Stunning and Simple Seasonal Salutations, an eBook featuring 10 beautiful handmade cards, complete with photos and descriptive "how-to" instructions, showcasing a variety of techniques such as rubber stamping, collage, and innovative paper and mixed media arts.