.jpg)
Wednesday 25 August 2010
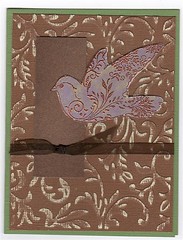
21 Aug Greeting Card
This is the card project from the Sat. Aug 21 Neat Nique at Cherish The Thought.The Core d nations cardstock is embossed and then sanded to remove the colour off the high points. The bird from Crafty Secrets is stamped and embossed on shiny cardstock, colourde with a stencil brush and cut out. It is mounted with a foam dot.
My Finished Envelope Book
I think I've said this before, Sunday was the big day, our regular ATC Vancouver monthly swap at The Grind and the delivery of my Envelope Book. I love Penelope's creative wrapping.
 It's always such a pleasure to receive the collaborative projects back from Penelope.
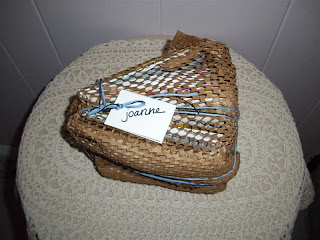
 This is the very interesting recycled wrapping Penelope used to present my envelope book to me last Sun. Isn't it fabulous, I have saved it to use in future projects.
 My front cover, we were given the pre-punched covers along with the envelopes and each of us decorated the covers for our own book. You saw these as lonely covers waiting for pages in this precious post.
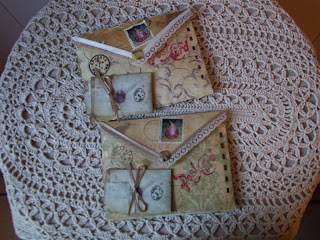
 This is a view of all the pages, doesn't this just make you want to see more?
 This is the back cover of my book made with sepia varnished scrapbook paper, distressed chipboard and a digital image of a vintage envelope with digital text added.
So I have another wonderful treasure to add to my collection, I know I am very lucky to be a part of this ATC group.
 It's always such a pleasure to receive the collaborative projects back from Penelope.
 This is the very interesting recycled wrapping Penelope used to present my envelope book to me last Sun. Isn't it fabulous, I have saved it to use in future projects.
 My front cover, we were given the pre-punched covers along with the envelopes and each of us decorated the covers for our own book. You saw these as lonely covers waiting for pages in this precious post.
 This is a view of all the pages, doesn't this just make you want to see more?
 This is the back cover of my book made with sepia varnished scrapbook paper, distressed chipboard and a digital image of a vintage envelope with digital text added.
So I have another wonderful treasure to add to my collection, I know I am very lucky to be a part of this ATC group.
My Envelope Book Pages
Now that everyone has their envelope book I can show you my envelope pages and the contents.
 Here is all 17 of the envelopes that I decorated for the envelope book created by 17 members of the ATC Vancouver swap group. I used paper from brown gift bags with a vintage black image, vintage letter ribbon, lace and some of my faux postage stamps.
 The front of a couple of envelope pages.
 The back of a couple of my envelopes. These used up some of my stash of 6X6 scrapbook papers painted with sepia acrylic varnish.
 This is one of my envelopes and the contents. Each envelope contained an ATC, all diferent and decorated on the back to look like a miniature postcard, the ATC background viewer, 2 pieces of lace and 2 hug tickets.
 This is an ATC background viewer that I included as a tool in my envelopes. It is cut from chipboard or cereal box cardboard and is the frame left when cutting an ATC with the Sizzix die. Ive had a and cut version that I've used for years to see what a background or stamped image would look like.
Saturday 21 August 2010
The Thank You Gift
Last Sunday at the ATC Vancouver swap I delivered the mini journal in the previous post along with a small knit felted bag as a thank you gift to Penelope for hosting our collaborative Envelope Book. Penelope has finally started a blog and you can check out her posting here.
 This is how I wrapped the gift. I used Ikea drawing paper randomly stamped with several different stamps, sandwiched between wax paper and stitched all around. This was then stitched into a pouch to hold the gift.
 This is the front of the gift pouch with lace seam binding used as a ribbon to tie the package closed.
Sunday 15 August 2010
4 X 4 Mini Journal
I've just completed another of my mini journals using My Minds Eye Life's Journey scrapbook paper and some of my own journal pages. The pages are punched with the Zutter Bind-it-all and bound with ribbons and coffee dyed fabric. This is a thank you gift for a friend.
Greeting Card Aug 14
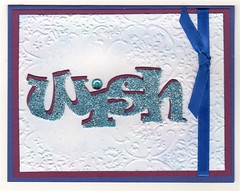
This is the neat nique project for this Sat at Cherish The Thought. Embossed with Cuttlebug embossing folder and a template to keep the circle area flat. Wish Sizzix die cut out of sticky paper and cardstock. The sticky paper is glittered then mounted slightly of centred on the cardstock piece to create a shadow effect. This is mounted on the embossed piece, which is mounted on another piece of cardstock and then onto the card blank.
Thursday 12 August 2010
Greeting Card Aug 12 Byhand Challenge
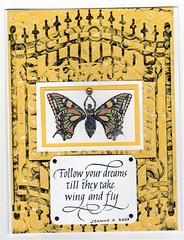
Yellow is one of the themes for the Byhand Challenge this week and I used a yellow scrapbook paper embossed with the butterflies background from the Cuttlebug Heritage embossing folder set. I sanded the high points to reveal the white core and then flattened it back out by running through the Cuttlebug a second time without the folder. Next I embossed with the gate folder, also from the Heritage set, and rubbed a Tuxedo Black Memento Dewdrop ink pad over the high points. The butterfly wings from a Crafty Secrets set are stamped and embossed with black, then coloured with gel pens. This is layered over a yellow and then white cardstock, attached to the gate background and a yellow gem sticker added to the goddess which is a Quietfire Design stamp. "Follow your dreams" quote is also from Quietfire Design and is stamped with Tuxedo Black Memento ink on white cardstock and attached to the gate with brads. This is then attached to a 5 X 6.5 white card blank
ATC Telephone For T Time
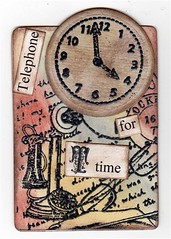
This is another example of ATCs for the August swap at The Grind in the Telephone and Time theme. I used a collage stamp which had a telephone and script and one from a time set for the clock.. The words are computer generated and the "T" is from a Crafty Secrets stamp set. The stamped images were embossed with Pearl Lustre Hematite embossing powder and the colour was added with Distress Inks.
Monday 9 August 2010
August 7 Greeting Card
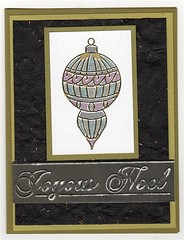
The neat nique for Aug 7 at Cherish The Thought is a head start on Christmas cards with a peel-offs ornament on white cardstock, coloured with gel pens then mounted on green cardstock. This is mounted on black handmade paper, then onto a paler green cardstock and finally onto the green card blank. The sentiment is embossed with a Crafts Too folder on the dark side of double-sided scrapbook paper and sanded. Just don't look too closely at my colouring mistake which has nothing to do with Jessie's teaching, but is all my own.
Monday 2 August 2010
Greeting Card For July 31
Here is the card I made at Cherish The Thought for the Sat Neat Nique. For this we used a fern stamp and stamped it with Versamark on shiny cardstock, the drew random circles with a clear glaze pen. Next step was to brayer ink from a Big and Juicy Waterfall ink pad onto the cardstock, then rubbed with a tissue to reveal the fern and circles. Now we used a different fern stamp and stamped it on another shiny cardstock. This was layered over coloured cardstock, then over the masked and brayered piece, over another cardstock and finally on a green card black
I think it's very pretty and this is the first time I did masking and brayering ink like this. Big fun and I need a Big and Juicy ink pad.
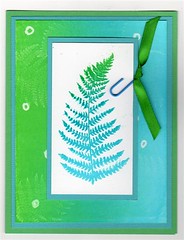
I think it's very pretty and this is the first time I did masking and brayering ink like this. Big fun and I need a Big and Juicy ink pad.
Subscribe to:
Posts (Atom)


.JPG)

 Download a FREE copy of the Artella eBook, Artella Mae's NEW Altered Ancestors!, a 58-page eBook overflowing with ideas and techniques for using vintage photos in your artwork.
  Download a FREE copy of the Artella eBook, Artist Profiles Assembled, a 100-page eBook featuring an inside look at the lives and art of 29 fascinating artists.
  Download a FREE copy of the Artella eBook, Stunning and Simple Seasonal Salutations, an eBook featuring 10 beautiful handmade cards, complete with photos and descriptive "how-to" instructions, showcasing a variety of techniques such as rubber stamping, collage, and innovative paper and mixed media arts.